


This is an assignment for the Coursera course Introduction to Music Production
Introduction
Hi, I’m Sungwon. I grew up in the United States, have been in South Korea the past 9 years and am now living in France for the time being. In this post, I’ll be explaining how to prepare Jack and Ardour 3 for recording midi in Ubuntu Linux (I’m running UbuntuStudio).
Preparing Jack and Ardour 3 in Ubuntu for Recording Midi
In the Intro to Music Production course, instructor Loudon Stearns gave us a checklist for setting up our preproduction environment.
- Proper Project Name and Location
- Digital Audio Preferences
- Recording File Type
- Hardware Settings
- Buffer Size
When recording with a DAW like Ardour in Linux, we have to do some extra work setting up audio with Jack before we can even launch, let alone configure, our DAW. So our project checklist will look more like this:
- Jack
- Hardware Settings
- Digital Audio Preferences
- Buffer Size
- Ardour
- Proper Project Name and Location
- Jack
- Connection Settings
- Ardour
- Digital Audio Preferences
- Buffer Size
- Recording File Type
Setting Up Jack
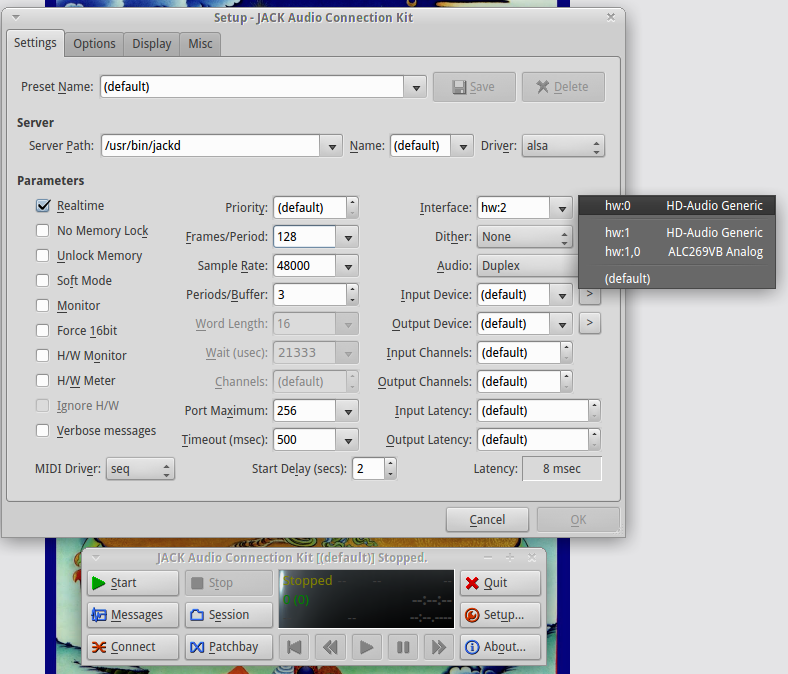
I use QjackCtrl as a GUI interface for Jack. After launching QjackCtrl, go to “Setup”. In the window that pops up, find the “Interface” section and click the “>” to the right of it. A dialog will popup listing the available interfaces. You should select your audio interface if you have one, if not you can select your computer’s sound card (usually hw0 or hw1).
While you have the “Setup” window open, set your buffer size with the “Frames/Period” dialog and “Sample Rate” to your desired values (a smaller value like 128 for buffer size will help reduce latency if you will be recording non-midi instruments and a sample rate of 48000Hz is the standard for professional audio and video work). Here we also will want to set the “Midi Driver” dropdown menu to “none”.
Next, press “Ok” to save your changes to Jack and press “Start” to start the Jack daemon. If Jack is unable to start, it is usually because you have selected the wrong Interface. In this case, go back into “Setup” and choose another interface.
Setting Up Midi in Jack

After starting Jack, you will need to start a2jmidi to connect your midi device to Ardour. Try typing:
a2jmidid -j default
into the command-line. If you get a server socket error, the a2jmidi daemon may already be started. In that case, type in:
a2j_control start
and all should be well. If you are using a synthesizer like phasex or yoshimi with your midi device, you can launch it now.
Now we can also finally launch Ardour.
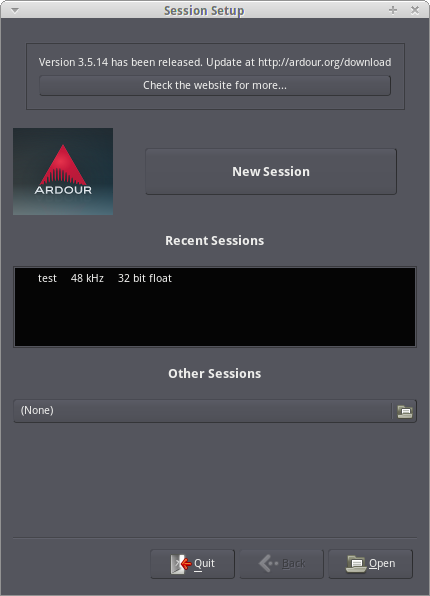
Choose “New Session”.

In Ardour, the Project Name is called “Session Name”. Name it anything that makes sense for your project. It’s a good idea to keep all your sessions in one folder so you know where to find them. I keep them in Home => Music => Ardour Projects. Note that you do not want to nest sessions/projects inside each other, i.e. save a session inside another session folder; this will make it difficult for you to differentiate which files belong to which session.
Back in Jack, open the connection settings window by pressing the “Connect” button.

Make sure your synthesizer (phasex in this example) outs are connected to the system playback inputs. This will allow you to monitor your playing.
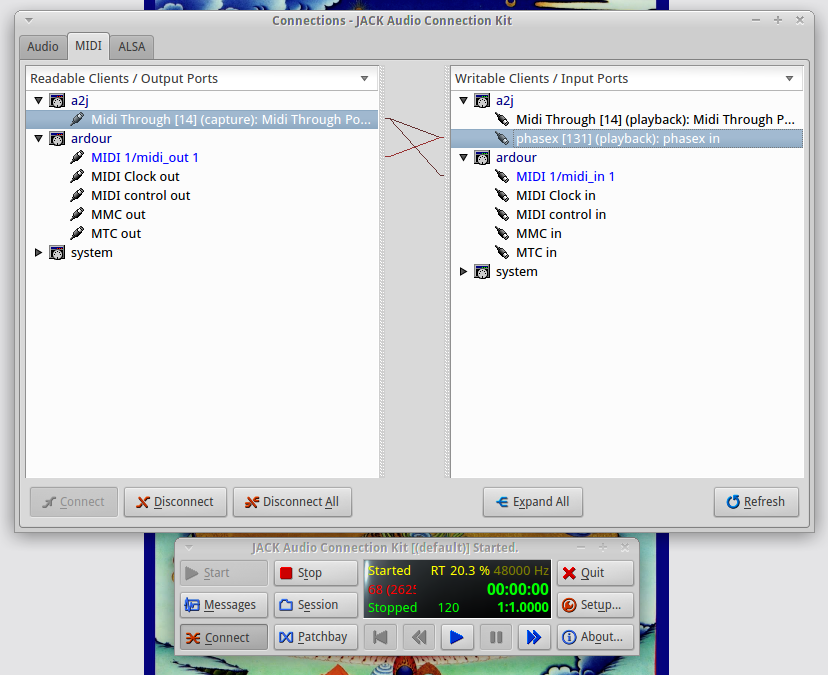
In the MIDI tab, a2j’s Midi through should be connected to both a2j’s phasex in (to connect the MIDI device signal to the synthesizer) and Ardour’s MIDI 1/midi_in 1 (so Ardour can also receive and record the MIDI signal). When you playback MIDI tracks in Ardour, you’ll also want to connect Ardour’s MIDI 1/midi_out 1 to a2j’s phasex in. However, when recording you’ll want to disconnect this because after a few minutes it will start producing feedback that will distort your MIDI signal.

Finally, make sure your MIDI device (an Oxygen25 keyboard in this case) is connected to your MIDI through in the ALSA tab.
Setting Up Ardour

Now that Jack is finally setup, you can configure Ardour for your session. In the top right, you’ll see the current values of some common preferences, including the sample rate (that we set before in Jack) and the recording file type.

To check or change the buffer size, click “Window” and select “Audio/MIDI Setup” from the menu.

In this window we can change the buffer size if we are also recording non-MIDI instruments.

To change the recording file type, choose “Session” => “Properties” from the main menu.

From the “Media” tab, we can choose our recording file type. “Broadcast WAVE” is the recommended type as it stores some extra backup information.

You’ll need a MIDI track to record to. Choose “Track” => “Add Track or Bus” from the menu.

Choose “MIDI Tracks” from the top dropdown menu. Now you’re ready for MIDI recording in Ardour!

Toggle the main and track red record buttons on and press the play button and you’ll be laying down a sweet MIDI track! Rock and roll!
Reflection
Thanks to my fellow students for peer reviewing this assignment!
Originally I planned to take the assignment on how to record and quantize MIDI, but in experiencing the trials and tribulations of trying to configure a DAW in Linux with Jack, I thought that this subject would be much more valuable for my own reference and for others interested in music production in Linux. Indeed, even though I setup MIDI successfully while watching the lessons, in preparing this assignment, I again ran into new difficulties and ways to get feedback out of my MIDI configuration.